
Example Editing Form: Upload/Edit Media
Uploading an Image
- To upload an image Rylan usually chose to edit his treehouse and went to Edit Step 3. Upload/Edit media. Sometimes he went directly to the Media Manager (accessed by the link on the Treehouse Manager).
- Next, Rylan clicked Browse to find an image that he wanted to upload to the ToL database on his own computer

 The image Rylan chose to upload, called leafmallow.jpg, "lives" on his computer in a folder called "RylanPictures". After he clicked Browse, Rylan found his leafmallow.jpg image in the "RylanPictures" folder and clicked to open it.
 - After Rylan selected the image on his computer the name of the image appeared in the space next to Browse.
- Rylan made sure the name of his image appeared next to the browse button, and then he clicked on Upload New Image to begin the upload.

- After Rylan selected an image from his computer and uploaded it to the ToL database the next step was to fill out the image data entry form and submit the image data to the ToL. See Filling Out the Data Entry Form directly below.
Filling out the Image Data Entry Form
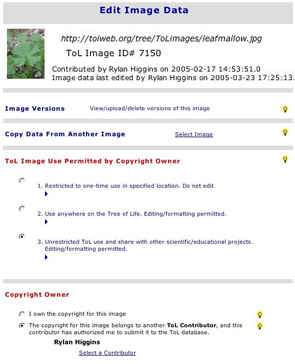 After Rylan selected an image from his computer and uploaded it to the ToL database the next step was to fill out the image data entry form and submit the image data to the ToL. In the image to the right you can see the beginning of the Image Data Entry form. Download a PDF of the complete form or browse a preview.
Below you can see the fields that Rylan filled out in the Image Data Entry form.
| Image Data Entry Fields that Rylan Filled Out. | What Rylan Filled Out/Selected |
|---|---|
| Use Permitted by Copyright Owner | #3 Unrestricted Use |
| Copyright Owner | Rylan was preselected as the copyright owner |
| Copyright Date | 2005 |
| Attached to Group | Core Malvales |
| Image Type | Photograph |
| Image Content | Specimen(s) one or several organisms |
| Location | Tucson, Arizona |
| Comments | Common names: little mallow, cheeseweed |
| Specimen Information | Live Specimen |
| Scientific Name | Malva Parviflora L. |
Uploading a Media File
Once in the Media Manager or on the Treehouse Upload/Edit Media Step, Rylan could see that the default type of file to upload is an image. If he was uploading a sound, movie or document file, he would need to select the correct radio button. From there, uploading a media file is the same process as uploading an image, though the data entry forms are slightly different for each type of media. Note that media files must be under 5 megabytes or you will not be able to complete the upload.